Last updated on 2020/01/13
A How To for basic image editing that adds style and substance to common stock imagery
By now, hopefully anyone writing for fun or to try and make a living understands the power of imagery in articles. This is one of the key attractors for people in getting attention to your writing and achieving those crucial eyeballs that drive page views. There are a number of excellent sites for free images like Unsplash, Pixabay, StockSnap, and many, many others (google search it!).
However, there is one downside to these sites. Everyone else is also using these same sites.
According to one estimation as of Jan 2, 2020, there are over 600 million blogs out in the world today with the US alone contributing at least 31 million new blog posting per month (source: How Many Blogs Are There). Therefore, the chances of that one perfect image that you found at the very top of your search results on the free stock image site having also been found by hundreds or thousands of other bloggers is pretty darn high.
So what can you do to make the odds a little more in your favor?
One of the simplest things that you can do is to simply make your own unique images. Please note – I am not suggesting that you go out and attempt to become a professional photographer! While that is certainly a viable option to get truly unique pictures, taking photos that are of professional quality is well beyond my ability to comment on. Instead, it is fairly simple to take these existing quality images and combine them together into new, unique creations that can help your posts stand out.
The best part is that this is easy, fun, and pretty simple to do once you understand the basics.
Before diving into the process I use to create these images a quick aside needs to be mentioned regarding image licenses. You own and can do whatever you want with pictures that you take. However, when using images from other people certain rights and restrictions can be in place per the site or creator of the images. Most of the free stock picture sites follow a Creative Commons license meaning that you can do pretty much whatever you want with the image. Use as-is, edit, chop up, etc. It is always a good practice to provide attribution for any images you use. Some sites and images require it, but even if they don’t, showing a level of respect for the artist is a best practice for blogging. Please make sure that you take the time to understand the licensing and any possible restrictions on images before you use them for your own work.
So now I have a blog post, a good idea of the content and topics for that post, and I am ready to start adding images to polish it up before posting. Great, let’s get started!
The following shows all of the steps that I used to create the image for this blog post using basic functions and free editing software. While this can also be done in almost any free editor (including Windows Paint), it can also be done in big premium apps like Photoshop, the grand-daddy of editing software. As we are poor bloggers, this post will focus on the free stuff. We will also focus on a true image editor instead of the basic Paint because this opens the door to a huge range of other image editing functions and features. This will get your foot in the door.
To start, grab a free copy of paint.net. This assumes that you are using Microsoft Windows. I don’t have access to a mac so I am not familiar with their software or options. Sorry mac users!
Paint.NET is free image and photo editing software for PCs that run Windows. It features an intuitive and innovative user interface with support for layers, unlimited undo, special effects, and a wide variety of useful and powerful tools. An active and growing online community provides friendly help, tutorials, and plugins.
text and links from the download page for dotPDN who develops and distributes paint.net
It started development as an undergraduate college senior design project mentored by Microsoft, and is currently being maintained by some of the alumni that originally worked on it. Originally intended as a free replacement for the Microsoft Paint software that comes with Windows, it has grown into a powerful yet simple image and photo editor tool. It has been compared to other digital photo editing software packages such as Adobe® Photoshop®, Corel® Paint Shop Pro®, Microsoft Photo Editor, and The GIMP.
Step 1 – Find Your Target Images
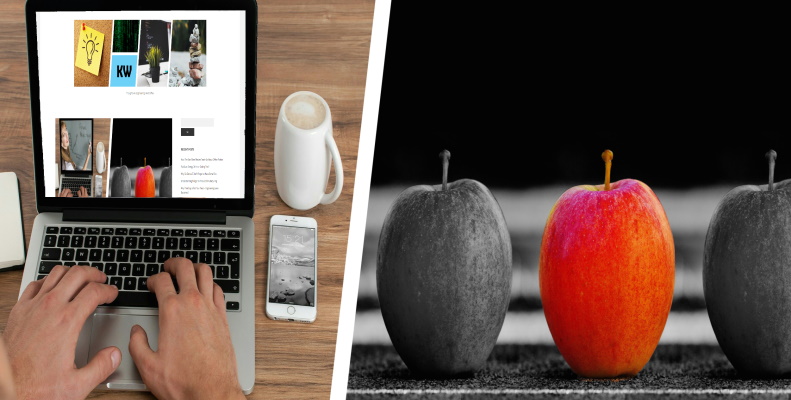
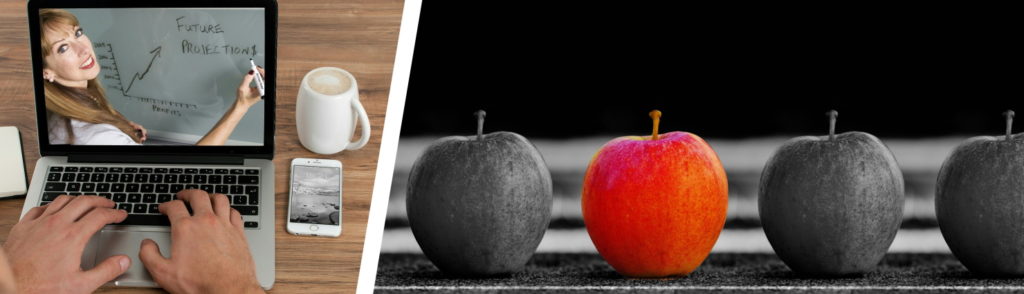
After downloading and installation of this software, before we jump into the software, the first thing that we need to do is to find some images. For this post I want to create a two-image collage with a off-vertical slash somewhere in the middle. I would also like to use the left side of this image as a standard image for any future tutorials and have the right side reflect the topic of the tutorial. Let the searching begin.
There are 3 sites I currently have accounts on: Unsplash, Pixabay, and StockSnap. Be careful with some sites as they have paid images alongside the free ones! The search starts with simple words, with a general idea in mind. First search: “tutorial“. Scrolling through images on the sites nothing really jumps out as a good starting point. In the same manner “manual“, “instructions“, and “lessons“. Finally when searching for “teacher” there are some good starting points.
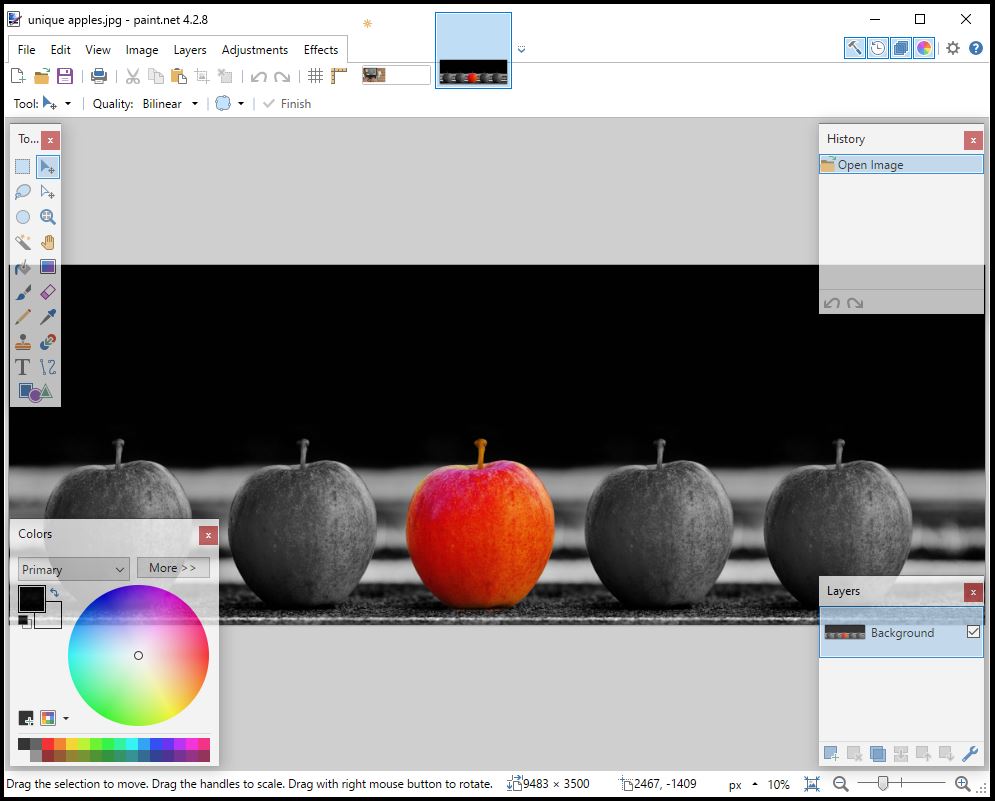
I am choosing this image as a staring point:
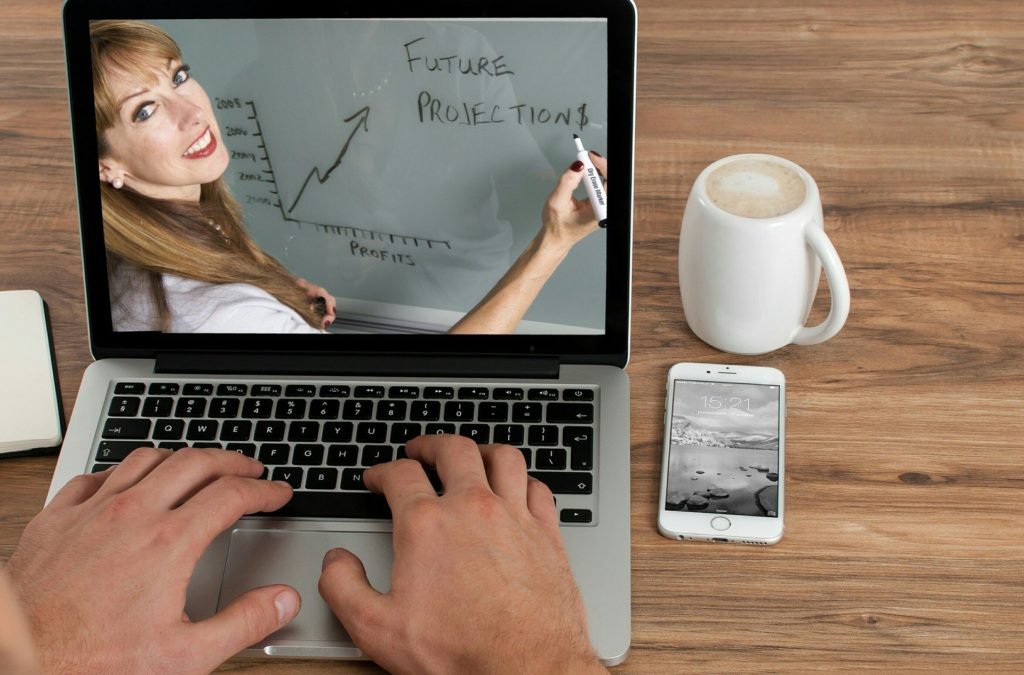
This image is left-centered, contains coffee (a theme of my blog), and can be combined easily with other images. It also allows for easy editing of the image on the computer screen, which is a bonus step to add to this instructional post!
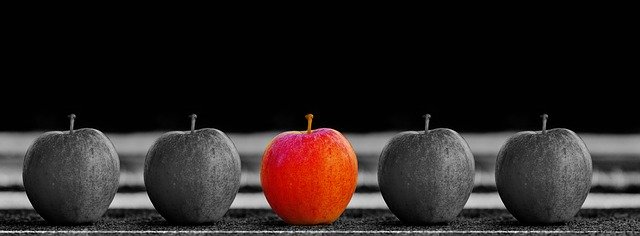
Now I need a second image to use for the right side of this image. My first search (“unique”) turns up some good ones right away. This image was a good candidate, but ultimately this one provides more impact in my estimation:
Pro Tip: Pay attention when downloading images to the image sizes. For editing, get the highest resolution image that you can find. For including on a blog post it is better to start with smaller images so that they download faster. Remember when editing that you can always shrink image sizes with no loss in clarity but making them bigger can reduce sharpness during the resizing processStep 2 – Create a Canvas In The Photo Editor
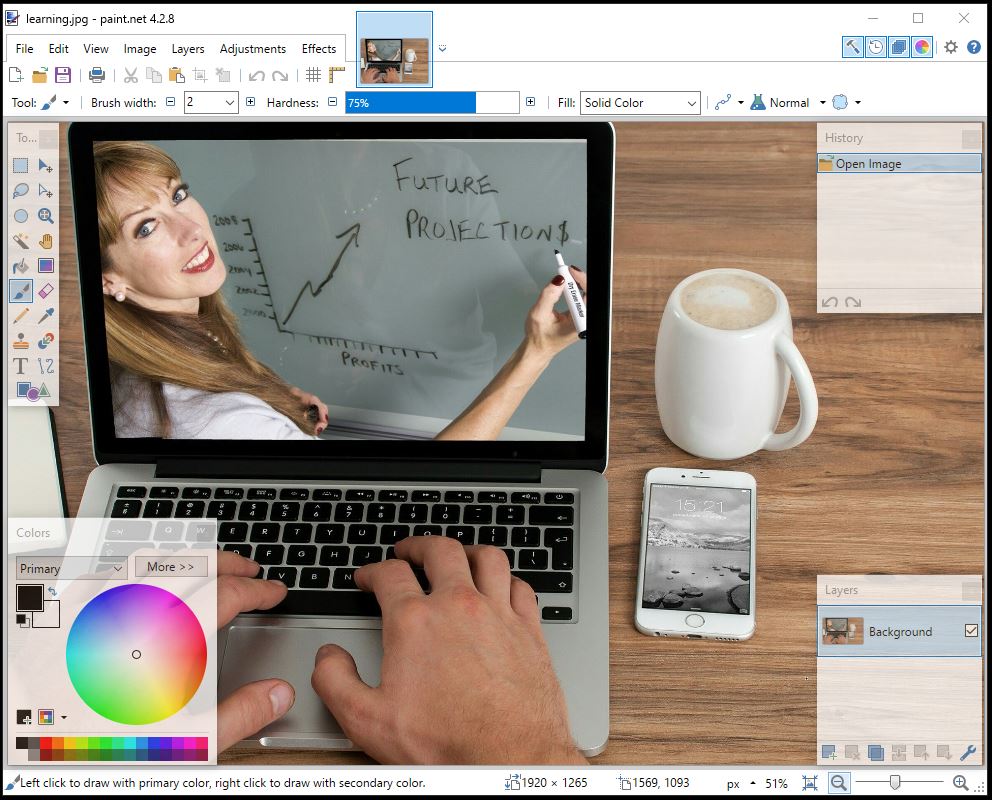
The first step to creating a custom, unique image is to simply open one of the images that you have selected to work on. For this tutorial, we will start with the first image with the computer from above. Go to File -> Open and select your saved image:
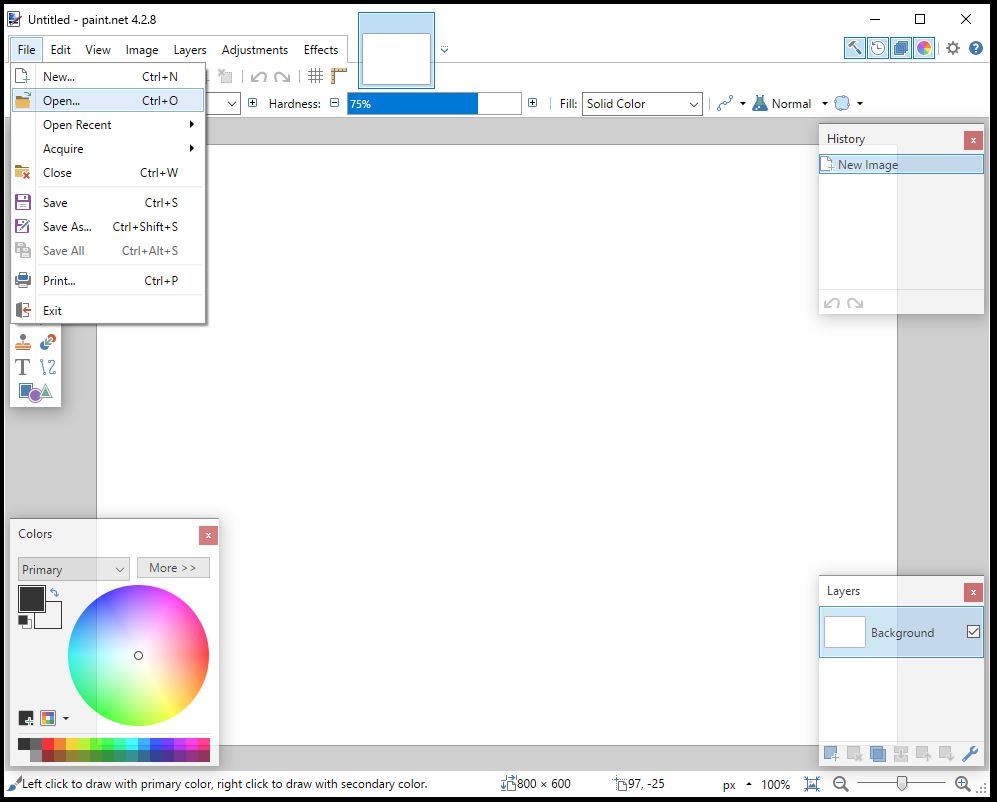
Next, navigate to your saved image and select it. After opening, I like to zoom out so that I can see the image in full. To do so, at the bottom right there is a slider and a “+” and a “-” magnifying glass. Use the “-” glass to zoom out. I initially zoomed out all the way to 25% zoom.
Next we will increase the canvas size so that we can bring in the second image. In the top menus go to Image -> Canvas Size and the following dialog pops up:
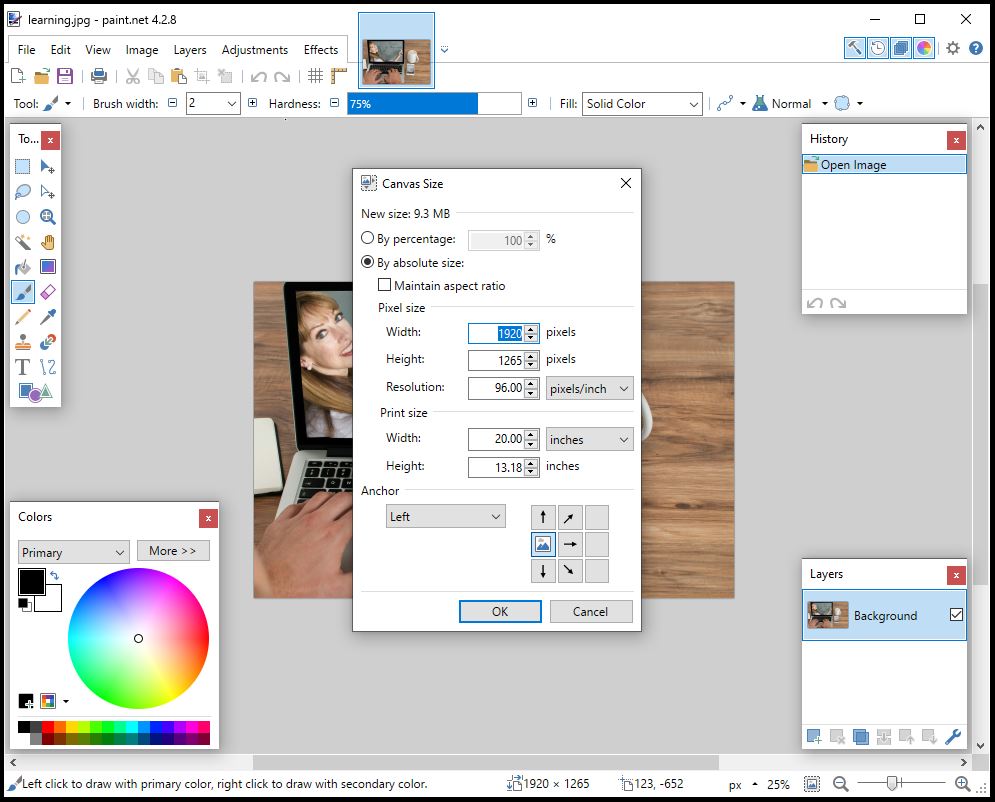
There is a key concept in an image editor. There is an image in a layer and there is a canvas. The canvas is the overall “frame” around the image. The layer (so far shown as “Background” in the layers area) can be all or part of that image. This concept of “layering” is key to understanding how much of the image editing process works.
For the Canvas Size popup, the first thing that we want to look at is the grid of 9 squares in the lower right of the popup. This shows the current canvas and how it will be positioned if the canvas frame grows or shrinks. For this exercise, we want this initial image to be roughly 1/3 of the overall final image. Therefore I selected the middle left square to start growing the canvas to the right. Next I go up to the “Width” property and multiple that value (in my example the 1920 number) by 3, and enter in 5760. Since I just want to grow the overall canvas frame and I don’t need it to be proportional, I make sure that the “By absolute size” button is checked and I leave the box for “Maintain aspect ratio” unchecked. Finally, to have some extra room vertically, I changed the height from 1265 up to 1600 pixels.
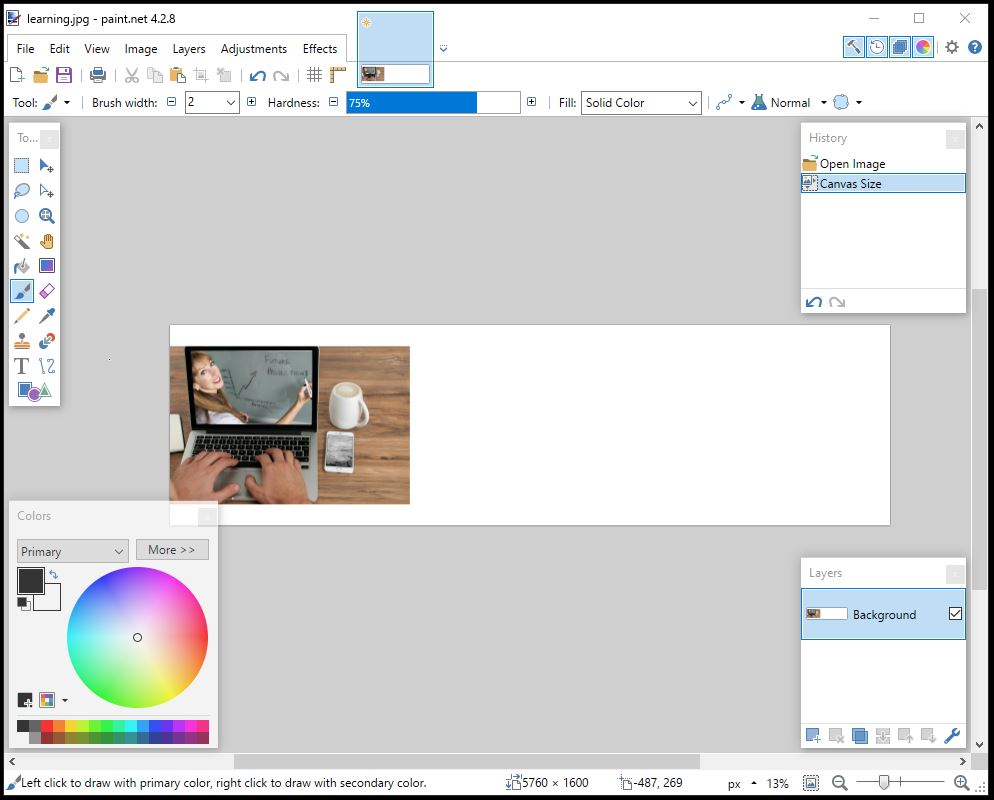
After selecting the “OK” button, zooming out some more (to 13% zoom), things now look like this:
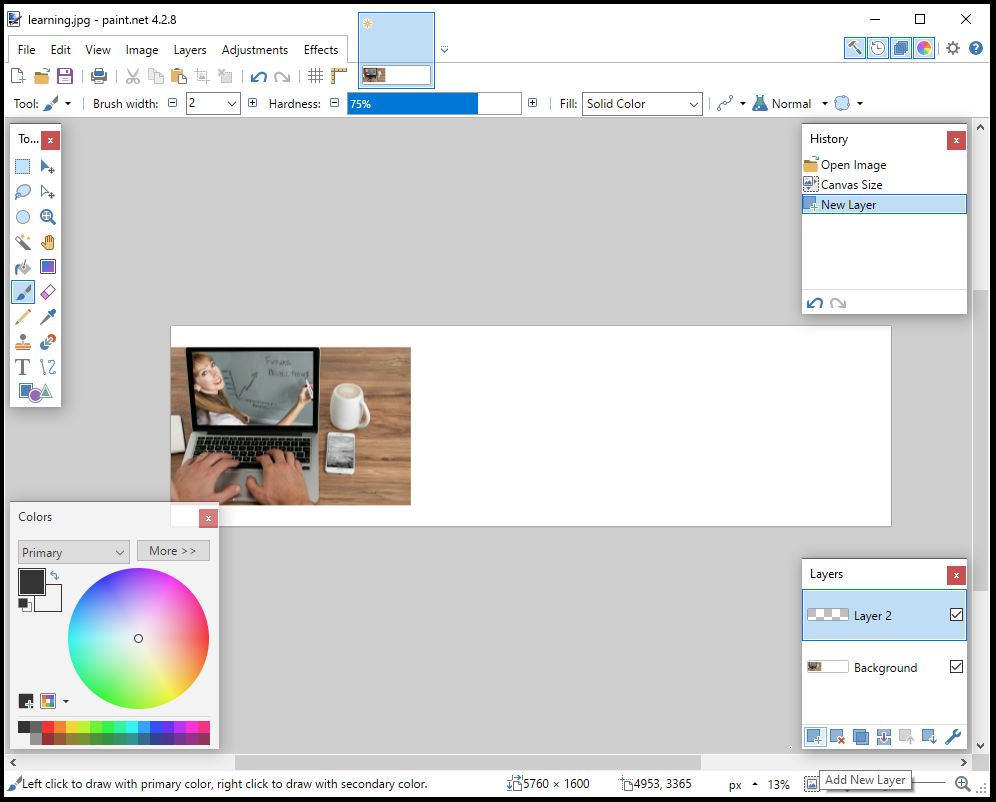
Step 3 – Add the Second Image
The next steps involve getting the second image in place within the canvas. The first thing to do is to add a new layer for the second image. In the layers area in the bottom right of the application, select the “Add New Layer” function. The image shows the app after a new layer has been added but for reference I left the add button highlighted.
Next, go open your second image. This will open in a new canvas. That is ok! Use the same File -> Open function from the beginning of Step 2 to open your second image. The app will now look something like the following where you can see both canvases open at the top of the app.
We don’t really want to do much with this second canvas, we really need the image over in our first canvas. The method I like to use is to copy and paste the image from one canvas to the other. This can be done by making sure you are in the second canvas and first pressing CTRL-A. This will select the entire image and you will see a dotted box surrounding the image at this point. Next press CTRL-C to copy the image information. Then select the first canvas, make sure Layer 2 is selected as the active layer and hit CTRL-V to paste the image.
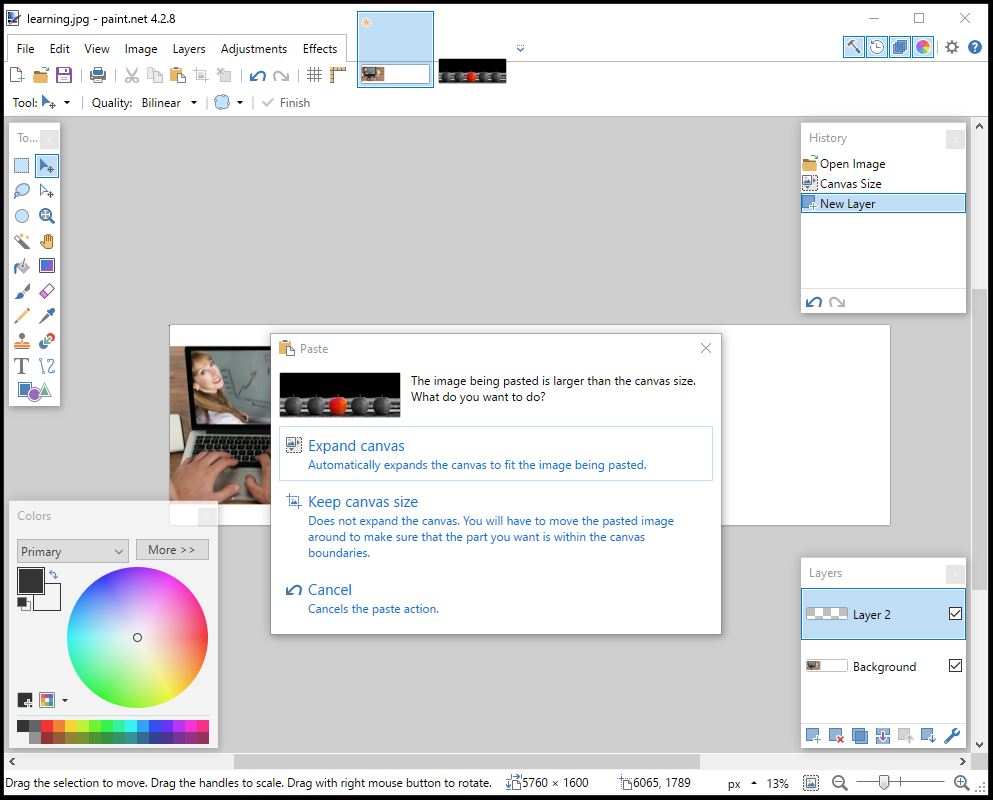
So it just so happens that my second image is larger in some way then the current canvas size. It is probably taller than 1600 pixels. Since we just expanded the canvas already, choose the “Keep Canvas Size” option. We will shrink the image down after it is pasted.
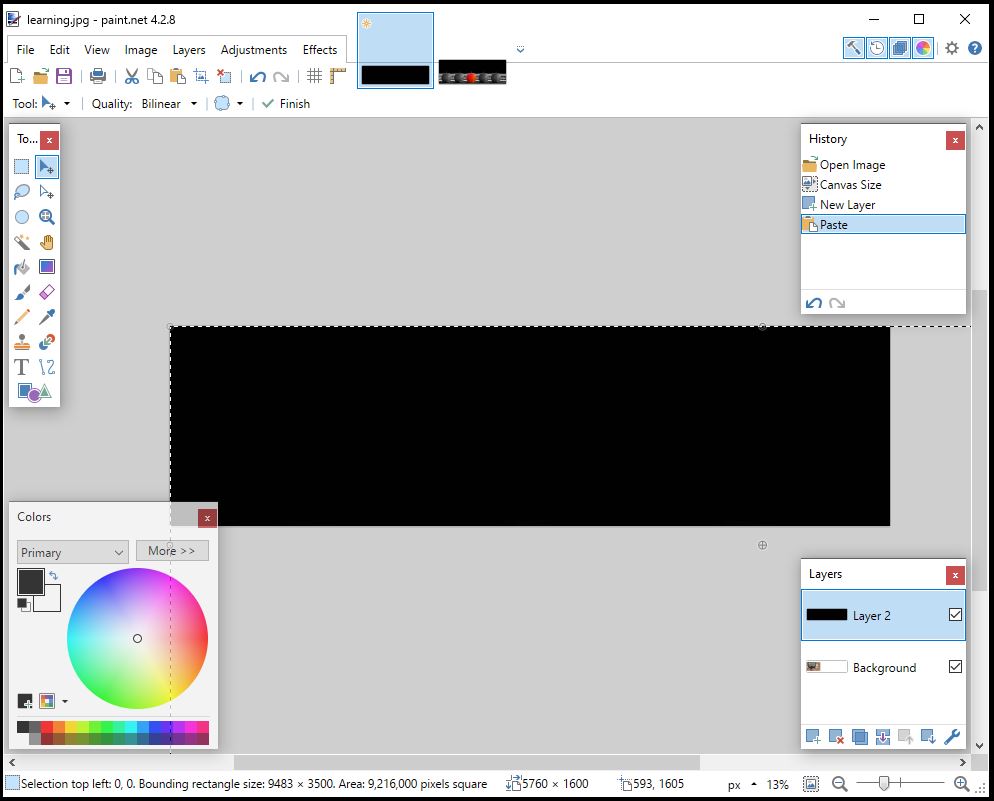
This next part can be a little tricky. Don’t worry if you mess it up. It is super easy to simply delete this layer and start over again. After doing this a few times you will be an old pro at it but don’t get discouraged if the first attempt is difficult. At this point we have the second image pasted into Layer 2 but we need to re-size and re-position the image. First, start by holding down the left Shift key. Keep it pressed until you are done adjust things. This forces the app to maintain aspect ratio as you size the image. There may be times that you want to shrink or expand the image either vertically or horizontally. In those cases you won’t be pressing the Shift key.
Next, select the small circle at the top left of the dotted box. By clicking and holding this circle we can re-size the image in this layer. This will not affect anything else in our canvas, only the data inside the box in this layer. While still holding Shift down, drag the circle down and right. Don’t drag it out of the canvas frame, otherwise you will have trouble moving the image. Once you have shrunk the image somewhat, clink and drag anywhere inside the dotted box to re-position the image.
This re-size and re-position step may take a few iterations to get things where you want them. I did them about 3 times and ended up with the layer looking like this:

You might note that the dotted box for the layer actually extends out of the frame. That is fine for what I am doing, but note in paint.net if you do this then that image information is lost as the app cuts it off. I want the apples a little bit bigger, so I am fine with the image getting cut off.
I have also decided that I am going to cut out the left apple which is why the left side of the image overlaps the other image. Next I am going to lock in the changes, so a hit CTRL-D to remove the selection box.
Step 4 – Add the White Slash
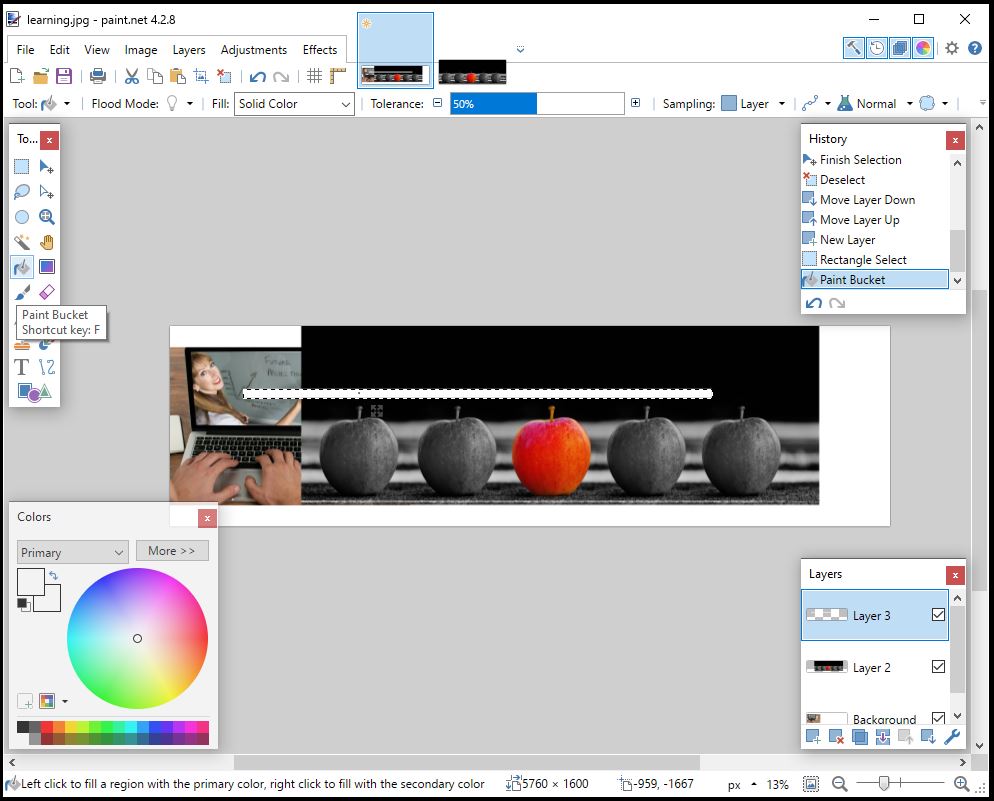
Now we will add the white slash in that will serve as the separator between the two images. First, add a new layer for the slash. Next, we will create a boundary box to contain the slash. Select the Rectangle Select tool from the toolbox and create a box in Layer 3. The height of the box will be the width of the slash. For the width it doesn’t really matter as long as the width is wider than the overall canvas is tall.

Next we will fill in the slash with white. I choose while because white is the background color for my site and will make the images appear to float mid-page. I next select the Paint Bucket tool and make sure to select the white color. The “Colors” box in the bottom right has two boxes at the top left of the color wheel. The top one is the foreground color and the back one is the background color. The Paint Bucket tool only uses the foreground color, so we want that one to show white. Once I have my color and tool selected, all I need to do is to click inside my dotted line box.
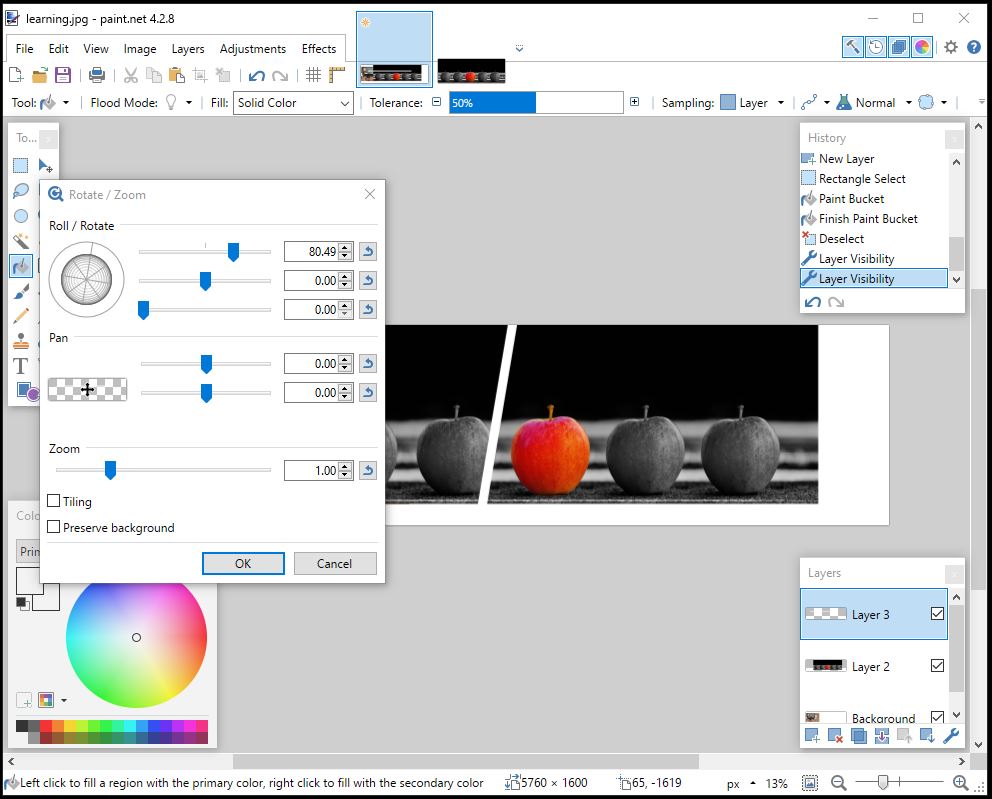
First I will de-select the box with DTRL-D. Next, I want to rotate the slash to the target location. To do this we will use the Layers menu. The options in this menu only apply to the selected layer. We do this because we only want to rotate the white box and nothing else on the canvas. Go to Layers -> Rotate / Zoom. A new popup appears and we will use this to rotate the layer. Due to the way my images are structured, I want the slash to go from the bottom left to top right. I then play around with the top rotate slider until I get the slash at an angle that looks good and select “OK” to save the rotation.
Step 5 – Re-Order the Images
At this point there is a consideration to make regarding the canvas that we are using. I would like to make more tutorials like this and I really like the left image as a common element for tutorials. It would be nice to save this so all I have to do is to replace Layer 2 and boom – I have my next custom post image. So this decision will drive the next few steps.
The first thing I am going to do is to re-order the layers. This can be simply done by selecting a layer and using the buttons with the up and down arrows at the bottom right of the layer area in the bottom right of the app. After moving Layer 2 down, my layer order from top to bottom is now: Layer 3, Background, Layer 2.
Next, I want to move my slash over and position it over the correct part of the layer titled Background. This can easily be done by selecting the Move Selected Pixels tool, selecting Layer 3, and dragging the slash over to the position you want it to be. An important note here! If you drag part of the image outside of the canvas frame you will chop off that part of the image. Be careful in your drag-and-drop. You can also use the arrow keys to move a layer around, although for a large canvas that can take a while.
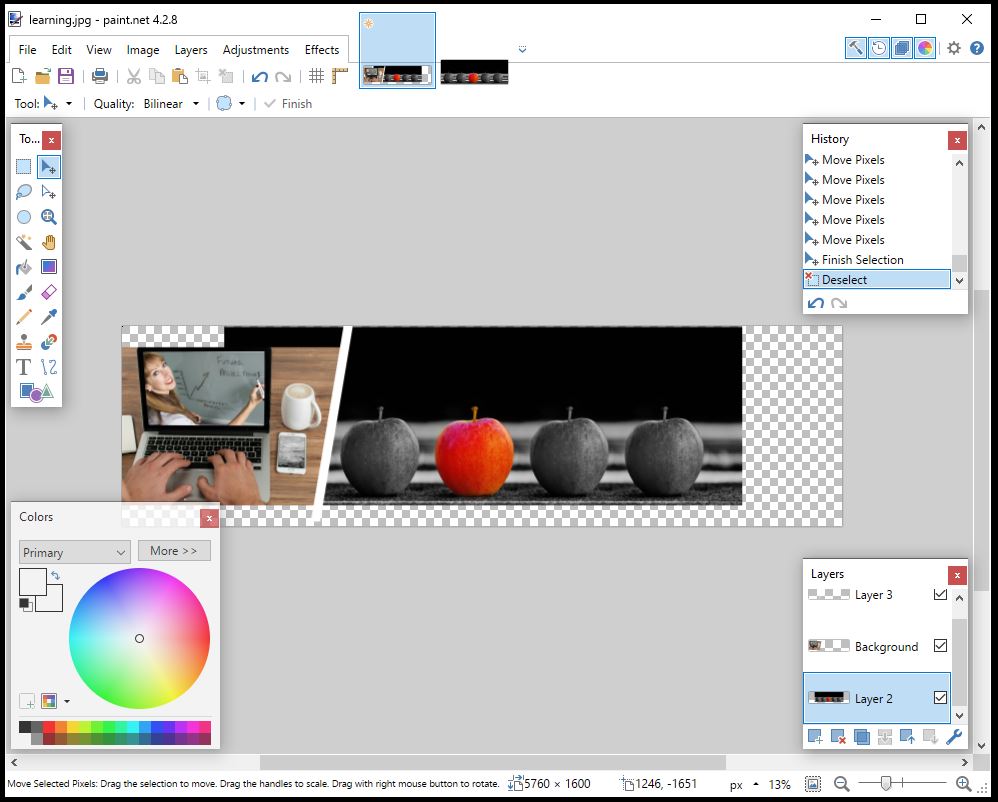
After re-ordering and moving the slash the canvas now looks like this:
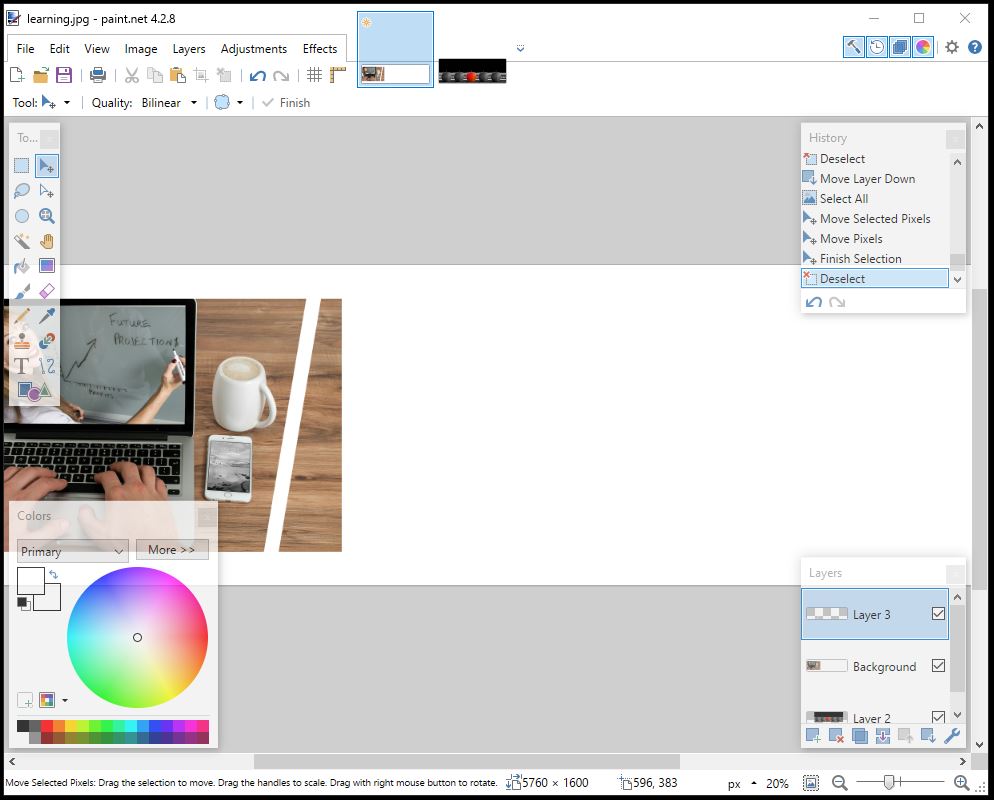
You might be wondering where Layer 2 has gone. It is there, it is just covered up by the layer called Background. Let’s get it back. Select the Magic Wand tool, make sure that the Background layer is selected and click on the blank white area to the right of the image. This will select all of that white area and then you can delete it using the DEL key on your keyboard.
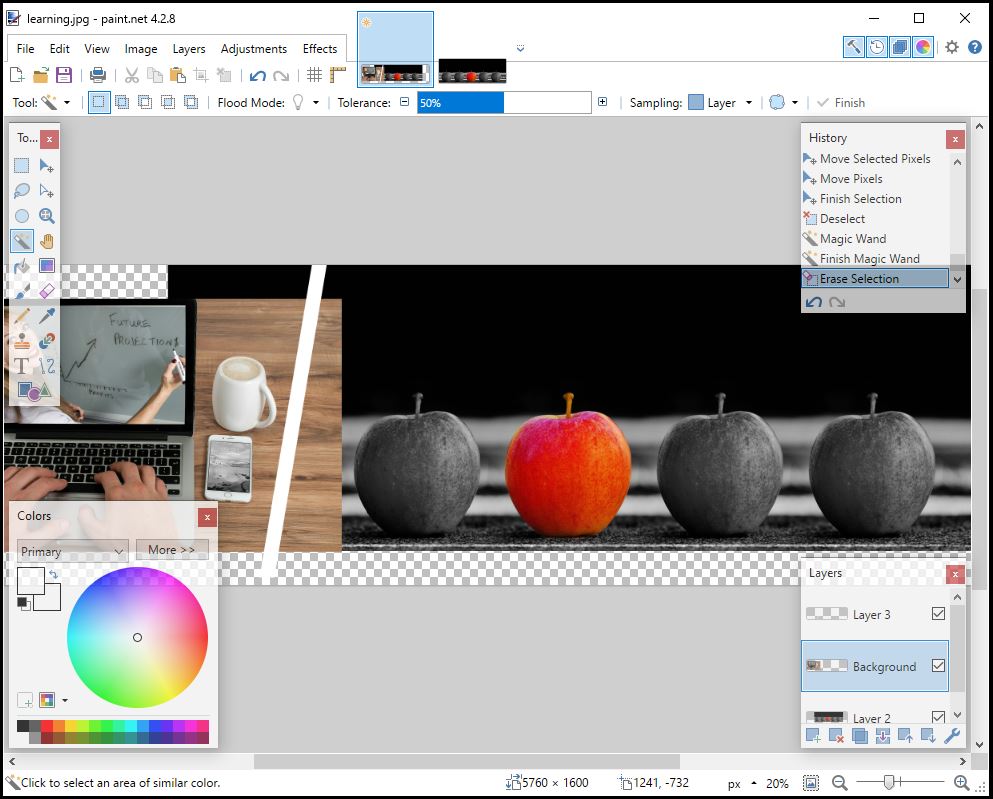
Next I want to remove the part of the computer image to the right of the slash. Using the Eraser tool from the toolbox, first I change the brush width to be larger due to the large size of the image and so that erasing is quicker then remove the part of the image the area to the right of the slash.
Step 5 – Cleanup and Export
We are getting close to being done! As a next step, the Layer 2 image needed to be re-positioned slightly. The Move Selected Pixels tool made quick work of this adjustment.
I am going to stop here and save this canvas as a tutorial template. This will allow me to quickly swap out the apples image with another one the next time I want to create a tutorial.
At this point I simply repeat a few steps in reverse. I shrink my canvas height down to 1265 pixels and the width down to 4400 and end up with the following image:
And there you have it! We now have a nice, unique image to put at the top of the post! I hope that this tutorial helped you to see that basic image editing is easier than it may seem (and also free). Thanks for reading!
PS – Bonus points to anyone who noticed that the final image used for this post does not match the image at the end of the tutorial. Nothing fancy was done to get to that final image. I simply used the steps here to cut a hole in the computer image and pasted a new layer behind that with a screenshot of this blog. Additionally, the image is narrower due to parts of the image being cut off by wordpress, so I made the image narrower than the one at the end of the tutorial. That is it!
Want to learn more? paint.net has a robust following and tons of tutorials for much more advanced editing functions which can be found here: paint.net tutorials. Also, the app can be extended with tons of new features using plugins which can be browsed here: paint.net plugins.
Good luck and keep learning!
Comments are closed, but trackbacks and pingbacks are open.